|
Working with sound
|   |
Sound clips
Springboard stores sound in sound clips, which appear in the Story Tree with this icon: ![]()
A sound clip contains a single sound, like a sound effect, a voice-over, a dialogue track, or a musical score. Sound clips play when the story is played in the Movie View, and are included when you export a movie.
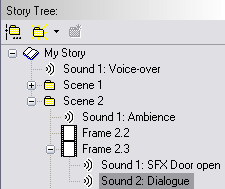
Sound clips can be placed in the story tree under the whole Story, under a Section, or under an individual Frame. For example, in the Story Tree pictured below:

The "Voice-over" sound clip is placed under the Story, so it will play throughout the story. The "Ambience" clip will play starting at the beginning of Scene 2. The "SFX door open" and "Dialogue" clips both play simultaneously at the beginning of Frame 2.3.
Sound clips are numbered consecutively within their parent element, just so they can have unique names.
Sound clips move with their parent story elements. In the previous example, if you increased the duration of Frame 2.2 so that Frame 2.3 started later, the Dialogue clip would play later as well. The Ambience clip would still start at the same time and last the same length.
When a sound clip is selected in the Story Tree, the Sound Clip Properties dialog is displayed in the Properties panel. This dialog lets you change the title and offset of the sound clip, and see its start time and duration.
Importing
You can import sounds from WAVE files into sound clips in a Springboard file using the File > Import Sound command. Imported sounds are copied and saved in the story file.
Note: At present, only WAVE files containing uncompressed PCM data are supported. You must convert compressed WAVE files or other sound files to this format before importing, using an external audio editing program. The next version of Springboard should support compressed WAVE files.
Exporting
Sound clips are mixed and included automatically in video files exported using the File > Export AVI command.
Future versions of Springboard will allow more options for export formats and codecs; currently, audio is always exported as 16-bit PCM at 22.050 kHz.
Recording
You can record sound clips while viewing your animatic in the Movie View. Use the Show More button ![]() in the Movie View's tool bar to display the Record Timing and Record Sound buttons
in the Movie View's tool bar to display the Record Timing and Record Sound buttons ![]() , set them appropriately as described in the Movie View topic, and press the Record button
, set them appropriately as described in the Movie View topic, and press the Record button ![]() to record.
to record.
Recorded sound clips are attached to the element selected when you begin recording. If a frame is selected and the Movie View continues playing into other frames, one sound clip is created for each frame. If a section or story is selected, only one sound clip is created.
Microphone setup
Before you record audio, be sure to set up your sound source appropriately. The exact steps to do this depend on your specific sound card, but you can often use the Windows Volume Control control.
To set up for recording with Windows Volume Control:
Keep the Volume Control open while you record. If what you record sounds distorted when you play it back, drag the Volume slider down until it sounds clean.
If you can't hear anything after you record sound:
Editing sound externally
You can use most sound editing software to edit sound clips directly from a story file. This can be useful if you want to change your recorded sound clips in ways that aren't yet available in Springboard. For more information, see Using an external sound editor.