|
Export Windows AVI
|   |
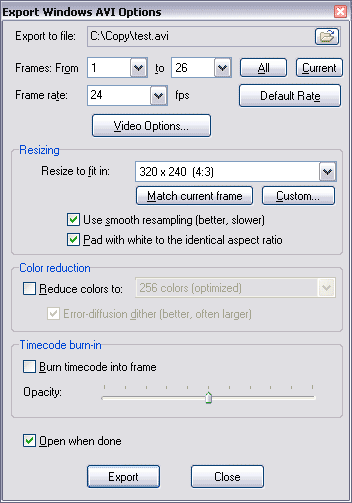
File > Export To > Windows AVI shows the standard Export To dialog to find a file name, followed by the Export Windows AVI Options dialog:

You can change the Frame rate to use for the exported movie with the drop-down box, or revert to the story's default frame rate with the Default Rate button.
The Video Options button brings up the Windows standard Video Compression dialog, letting you choose from all the video compressors available on your computer and customize their options. Springboard tries to select a compressor and compression settings that will work well for you, but for optimum results you may need to experiment.
You can use the standard Resizing options to create an AVI file with a different size than your story's default size. An AVI file must have a single consistent size throughout, so if your frames are different sizes, these settings will control how they are fit into the AVI file's frame size.
You may need to select the Color reduction options to work properly with your chosen video compressor. Using no color reduction is usually appropriate; if color reduction is required by a compressor, Springboard attempts to turn it on automatically, but you may need to experiment.
You can select the Timecode burn-in options to show the current story time in the lower right corner of every frame of the AVI file. The Opacity slider adjusts the transparency of the gray rectangle behind the timecode.
Sound clips in your story will automatically be mixed down into the output AVI file.
If you check Open when done, the AVI file will be opened and played in the default movie player registered on your computer.