Local and global layers
Previous Topic  Next Topic 

The default Base and Camera layers are global layers, meaning they exist with the same name and settings in all frames in the file. If you change any of the properties of a global layer, they will change everywhere in the file.

Global layers are most useful for holding annotations that you want to make across all frames. The default Camera layer is a good example: many frames will have camera movement, and it's handy to be able to turn them all on or off together. Other examples of global layers you might like to add to your projects are:

You can also use local layers, that exist only in the current frame. You can use local layers in addition to the Base layer to develop and organize the image for a given frame, without affecting any other frames. For examples of local layers, see the nested layers section.

Global layers' icons are drawn with a black border around them in the Layers palette. For example, in this Layers palette:

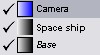
the Camera layer is global (and selected), the Space ship layer is local, and the Base layer is global.

Note: The Base layer is always global. It cannot be made local, and it cannot be deleted. You can rename it and change its color, though. The Base layer's name appears in italics in the Layers palette to indicate this special status.

To create a new global or local layer:

  1. Do Layer > New
    - or -
    Right-click anywhere in the Layers palette and choose New from the context menu
    - or -
    Click the New Layer button in the Layers palette.
  2. You'll see the Layer Properties dialog. It looks like this:
  3. Type a name for the new layer.
  4. Select whether you'd like it to be Local or Global.
  5. Change the color if you like, by clicking the arrow next to the color swatch and picking a different color.
  6. Press OK.

To change an existing layer from global to local:

  1. Make sure the layer is selected in the Layers palette.
  2. Do Layer > Properties
    - or -
    Right-click the layer in the Layers palette and choose Properties from the context menu
    - or -
    Double-click the layer in the Layers palette.
  3. You'll see the Layer Properties dialog:
  4. Click the Local radio button.
  5. Click OK.
  6. A confirmation dialog box will appear that looks like this:
  7. Click OK.

The layer you selected will be removed from all other frames in the file, and kept only in the current frame.

To change an existing layer from local to global:

  1. Make sure the layer is selected in the Layers palette.
  2. Do Layer > Properties
    - or -
    Right-click the layer in the Layers palette and choose Properties from the context menu.
    - or -
    Double-click the layer in the Layers palette.
  3. You'll see the Layer Properties dialog:
  4. Click the Global radio button.
  5. Click OK.

The layer you selected will be created in all other frames in the file. Any image contents are not duplicated, though; new layers in other frames are empty.

A context menu is a menu that pops up when you right-click. It provides commands that apply to whatever object you right-clicked. Context menus are available for most objects in Springboard.