|
Frame Animation View
|   |

The Frame Animation View lets you animate layers within an individual frame.
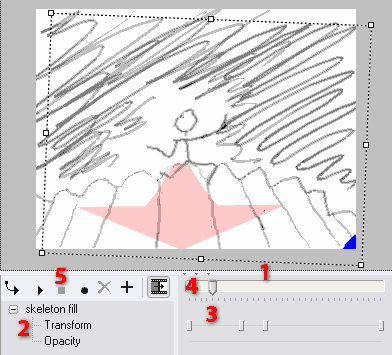
You can open the Frame Animation View with the View > Frame Animation command, or by opening the splitter bar above it [1].
The Frame Animation View contains a property tree [2] that shows the animated properties of the current layer in the current frame. The two animated properties currently available are the transform, which controls the layer's size, rotation, and position, and the layer opacity.
To the right of the property tree is a timeline [3] that shows keys where the animated properties have been set. The value of a property is fixed at its keys; between the keys, the property is interpolated - it varies smoothly and automatically from one key to the next.
You can move around in the timeline by clicking in it, or by dragging the timeline slider [4] above it. The current time is called the poster time. The poster time is the time at which a frame is rendered for use in all static displays, such as printing, exporting to sequential image files, or in the story grid when the Frame Animation View is hidden. In the Movie View and when exporting to AVI, the full frame animation is shown.
Note: In the unregistered version of Springboard, only animation in the first frame is visible in the Movie View and when exporting to AVI. Subsequent frames are rendered at their start time.
The poster time's value is displayed on the main tool bar, between the zoom percent and the frame number.
You can make a new key by moving to a time with no key, then pressing the Add Key ![]() button in the tool bar [5] at the top of the view. Or, you can simply change the key's value - e.g., by moving a layer with the Move Layer tool or changing its opacity with the Layer Opacity slider.
button in the tool bar [5] at the top of the view. Or, you can simply change the key's value - e.g., by moving a layer with the Move Layer tool or changing its opacity with the Layer Opacity slider.
You can delete a key by clicking it, then pressing the Delete Key button ![]() , or by right-clicking it and choosing Delete Key from the context menu. Clicking the Delete Key button while no keys are selected deletes all keys at the current time.
, or by right-clicking it and choosing Delete Key from the context menu. Clicking the Delete Key button while no keys are selected deletes all keys at the current time.
You can move keys left or right by dragging them.
You can play the frame's animation in real time using the Play ![]() and Stop
and Stop ![]() buttons in the tool bar. If you play through the end of the frame, the poster time is reset to its position when you started playing. If you press Stop before the frame is finished playing, the poster time is set to the time at which you pressed Stop. The Spacebar is the shortcut key for Play and Stop.
buttons in the tool bar. If you play through the end of the frame, the poster time is reset to its position when you started playing. If you press Stop before the frame is finished playing, the poster time is set to the time at which you pressed Stop. The Spacebar is the shortcut key for Play and Stop.
You can play the frame from beginning to end with the Play From Start ![]() button in the tool bar. When the end of the frame is reached, the poster time is reset to its position when you started playing. The Enter key is the shortcut for Play From Start.
button in the tool bar. When the end of the frame is reached, the poster time is reset to its position when you started playing. The Enter key is the shortcut for Play From Start.
If the Render Transitions ![]() button in the tool bar is highlighted (the default), transitions between the previous and following frames will be rendered normally. Clicking the Render Transitions button toggles this behavior. Transitions will always be rendered in the Movie View and in Export Windows AVI, whether or not Render Transitions is highlighted.
button in the tool bar is highlighted (the default), transitions between the previous and following frames will be rendered normally. Clicking the Render Transitions button toggles this behavior. Transitions will always be rendered in the Movie View and in Export Windows AVI, whether or not Render Transitions is highlighted.
Recording layer animation
You can use the Frame Animation view to record animation interactively. As you make changes to a layer, Springboard can record your changes in real time as keys, so you can play back your animation just as you recorded it. This is a very quick way to make simple layer animation.
Currently, you can record layer transformations (position, rotation, and scale) using the Move Layer tool, and opacity using the Layer Opacity slider.
To record layer animation:
Your changes will be recorded and saved in keys for the appropriate property.
If you drag the mouse for longer than the current frame duration, the frame is extended to include your entire drag.
To animate a layer with changes in more than one transformation component, you must record the most difficult part first, then make the remaining key changes one at a time. For example, if you want a layer to dance around and grow bigger at the same time, record the dancing motion first, then go to the end of the frame and scale the layer up.
This restriction doesn't apply to opacity - opacity and transformations are fully independent, and both can be recorded independently.